
日頃、本体電源を終日落とさず、退社時にディスプレイオフにしているだけの岡持ち Mac Pro (Mid 2010) に ffmpeg をインストールし、cronと組み合わせてディスプレイ 内蔵カメラ による、退社後のオフィス 定点静止画撮影 の仕組みを考えてみました。
内蔵カメラはiSight
以前にも何度か登場するこの岡持ちMac Pro(Mid 2010)のApple LED Cinema Display (27”) には、中央上部にウェブカメラとマイクが内蔵されているのですが、このディスプレイのマニュアルや仕様表には、カメラの解像度などのスペックに関する記述はありません(ちなみにその右の変わった解像度のディスプレイは以前紹介したいわゆるツイ廃液晶を横向きに使用しているものです)。

図1.Apple LED Cinema Display プロパティ
システムのハードウェア情報から、内蔵カメラの型番情報は得られましたが、このProductIDでの情報は皆無。それでもなんとか、解像度が最大1,280×1,024pxまで対応していることは分かりました。
UVC Camera VendorID_1452 ProductID_34056
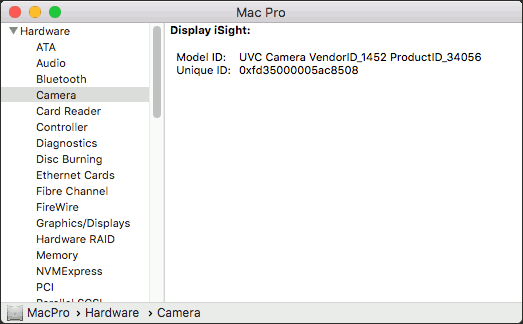
図2.内蔵カメラのシステムプロパティ
Homebrewからffmpegインストール
CLIベースでカメラを制御するために、macOS向けのパッケージ管理マネージャ、Homebrewからffmpegをインストールします。ターミナルから以下のコマンドを実行…
$ brew install ffmpeg
するのですが、このMac Proは搭載されているグラフィックボードATi Radeon HD 5770がメタル非対応につき、macOS 10.13.6 High Sierraのまま使い続けているため、冒頭に毎回、サポート外警告が現れ少し嫌な予感。
Updating Homebrew...
Warning: You are using macOS 10.13.
We (and Apple) do not provide support for this old version.
You will encounter build failures with some formulae.
Please create pull requests instead of asking for help on Homebrew's GitHub,
Twitter or any other official channels. You are responsible for resolving
any issues you experience while you are running this
old version.
それでも依存関係のあるパッケージを取得に行ってくれるものの、とにかく遅くて30分程度放置させた頃、次のエラーメッセージで異常終了。
==> Downloading https://downloads.xiph.org/releases/theora/libtheora-1.1.1.tar.bz2
Trying a mirror...
==> Downloading https://ftp.osuosl.org/pub/xiph/releases/theora/libtheora-1.1.1.tar.bz2
Error: ffmpeg: Failed to download resource "theora"
Download failed: Homebrew-installed `curl` is not installed for:
  https://downloads.xiph.org/releases/theora/libtheora-1.1.1.tar.bz2
curlをアップデートしてエラー解消を狙う
上記メッセージの最後に、
Homebrew-installed `curl`
がインストールされていないことが挙げられています。
curl
自体はこのように存在しますが、
$ curl --version
curl 7.54.0 (x86_64-apple-darwin17.0) libcurl/7.54.0 LibreSSL/2.0.20 zlib/1.2.11 nghttp2/1.24.0
Protocols: dict file ftp ftps gopher http https imap imaps ldap ldaps pop3 pop3s rtsp smb smbs smtp smtps telnet tftp
Features: AsynchDNS IPv6 Largefile GSS-API Kerberos SPNEGO NTLM NTLM_WB SSL libz HTTP2 UnixSockets HTTPS-proxy
これはHomebrewから入れたものではないので、あらためてHomebrewからインストールしてみます。
$ brew install curl - 略 - ==> Summary/usr/local/Cellar/curl/7.80.0: 491 files, 3.9MB, built in 1 minute 38 seconds ==> Caveats ==> curl curl is keg-only, which means it was not symlinked into /usr/local, because macOS already provides this software and installing another version in parallel can cause all kinds of trouble. If you need to have curl first in your PATH, run: echo 'export PATH="/usr/local/opt/curl/bin:$PATH"' >> ~/.profile For compilers to find curl you may need to set: export LDFLAGS="-L/usr/local/opt/curl/lib" export CPPFLAGS="-I/usr/local/opt/curl/include" For pkg-config to find curl you may need to set: export PKG_CONFIG_PATH="/usr/local/opt/curl/lib/pkgconfig"
インストールは正常に完走しましたが、終わりのメッセージにある通り、既存の
curl
との衝突を嫌ってシンボリックリンクは設定いないので、このHomebrew版
curl
を使うには、環境変数PATHにパスを追加してターミナルに入り直します。
$ echo 'export PATH="/usr/local/opt/curl/bin:$PATH"' >> ~/.profile
$ logout

$ curl --version
curl 7.80.0 (x86_64-apple-darwin17.7.0) libcurl/7.80.0 (SecureTransport) OpenSSL/1.1.1l zlib/1.2.11 brotli/1.0.9 zstd/1.5.0 libidn2/2.3.2 libssh2/1.10.0 nghttp2/1.46.0 librtmp/2.3 OpenLDAP/2.5.8
Release-Date: 2021-11-10
Protocols: dict file ftp ftps gopher gophers http https imap imaps ldap ldaps mqtt pop3 pop3s rtmp rtsp scp sftp smb smbs smtp smtps telnet tftp
Features: alt-svc AsynchDNS brotli GSS-API HSTS HTTP2 HTTPS-proxy IDN IPv6 Kerberos Largefile libz MultiSSL NTLM NTLM_WB SPNEGO SSL TLS-SRP UnixSockets zstd
再度トライもrustのインストールでエラー
続いてもう一度、Homebrewよりffmpegをインストールしてみます。
curl
を新しくしたことで依存パッケージ群のダウンロードは完走、長い長い
make install
セクションが始まりました。1時間ほど経って依存パッケージのインストールも終盤に差し掛かった頃、次のエラーで異常終了です。
==> Installing ffmpeg dependency: rust
==> ./configure --prefix=/usr/local/Cellar/rust/1.56.1 --release-channel=stable
==> make
Last 15 lines from /Users/user/Library/Logs/Homebrew/rust/02.make:
using ::isunordered;
      ~~^
/Library/Developer/CommandLineTools/usr/include/c++/v1/cmath:325:9: error: no member named 'isunordered' in the global namespace
using ::isunordered;
      ~~^
13 errors generated.
ninja: build stopped: subcommand failed.
thread 'main' panicked at '
command did not execute successfully, got: exit status: 1

build script failed, must exit now', /Users/user/Library/Caches/Homebrew/cargo_cache/registry/src/github.com-1ecc6299db9ec823/cmake-0.1.44/src/lib.rs:885:5
note: run with `RUST_BACKTRACE=1` environment variable to display a backtrace
	finished in 40.352 seconds
Build completed unsuccessfully in 0:03:41
make: *** [all] Error 1

Do not report this issue to Homebrew/brew or Homebrew/core!

These open issues may also help:
Rust-dependent formulae on Apple Silicon - upstream issue tracker https://github.com/Homebrew/homebrew-core/issues/68301
rust
パッケージを個別にHomebrewからインストールしようとしましたが、同じエラーが出ました。やはり古いmacOSでは厳しいようなので、Homebrewからのインストールは諦めます。
ffmpeg公式からStatic Buildをダウンロード
ffmpegの公式サイトのダウンロードページを開きます。ページ上部の大きなボタンはソースコードをダウンロードするボタンです。これは、上述のHomebrewと同じ憂き目に遭うこと確実なので、その左下にある、「Get packages & executable files」中のリンゴボタンにマウスカーソルを当てると、その下に出てくる、Static builds をクリックします。
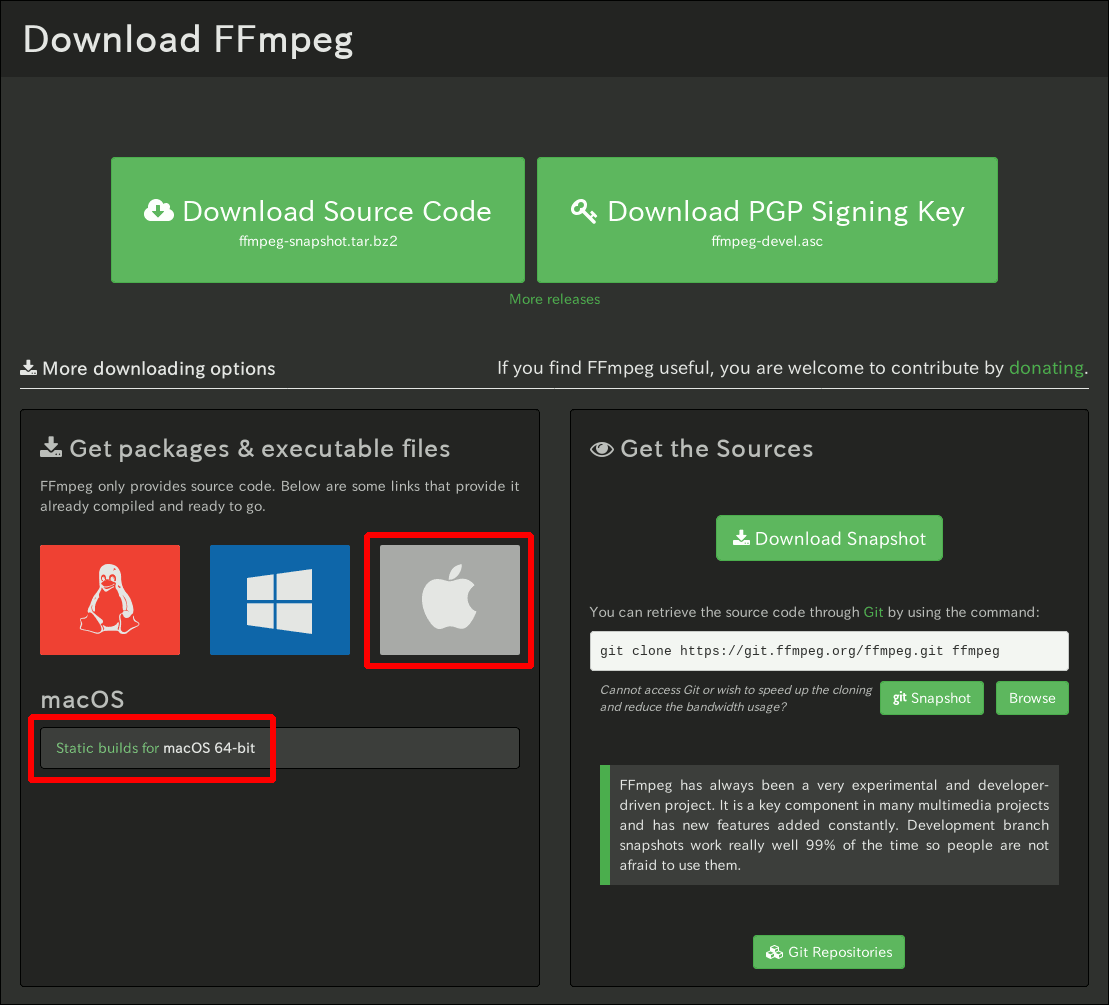
ショートカット図3.ffmpeg ダウンロード
遷移先のページではffmpegやその周辺ツールの、既にビルドされたバイナリファイルが用意されています。その中のffmpegをダウンロードしますが、7z圧縮ではなくその下の「Download as ZIP」をクリックすると、macOS標準状態でも解凍可能です。
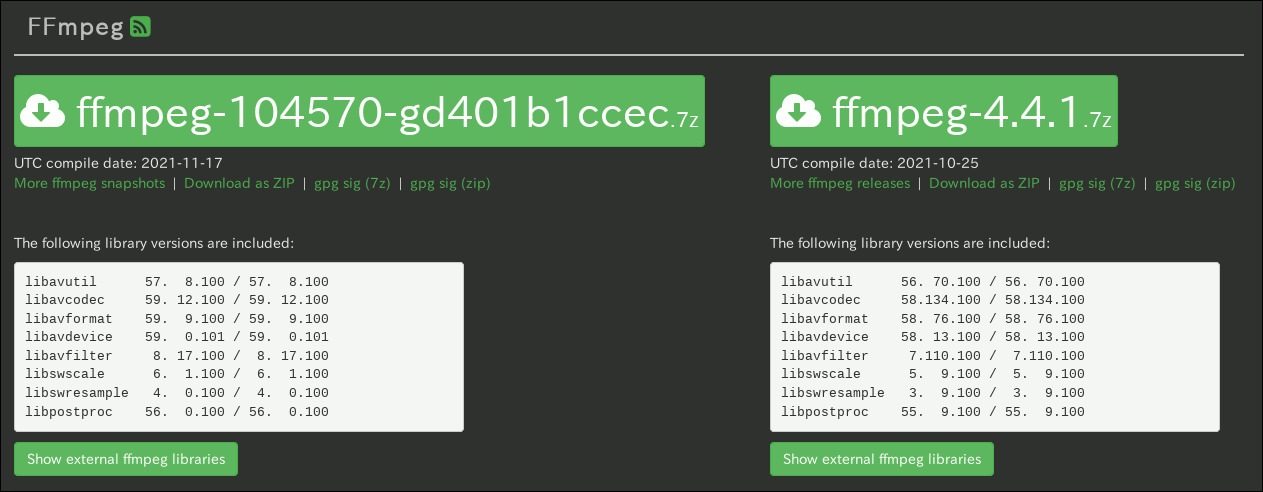
図4.ffmpeg Static Build ダウンロード
解凍したバイナリを管理者権限で/usr/local/bin/へ複製するだけで、インストールは完了です。
$ ls -l
-rwxr-xr-x  1 user  staff  77917384 Nov 16 20:35 ffmpeg
-rw-rw-r--  1 user  staff  24102486 Nov 17 16:21 ffmpeg-104570-gd401b1ccec.zip
$ sudo cp ./ffmpeg /usr/local/bin
$ ls -l /usr/local/bin/ffmpeg
-rwxr-xr-x  1 root  staff  77917384 Nov 17 16:31 /usr/local/bin/ffmpeg

$ ffmpeg
ffmpeg version N-104570-gd401b1ccec-tessus  https://evermeet.cx/ffmpeg/  Copyright (c) 2000-2021 the FFmpeg developers
  built with Apple clang version 11.0.0 (clang-1100.0.33.17)
  configuration: --cc=/usr/bin/clang --prefix=/opt/ffmpeg --extra-version=tessus --enable-avisynth --enable-fontconfig --enable-gpl --enable-libaom --enable-libass --enable-libbluray --enable-libdav1d --enable-libfreetype --enable-libgsm --enable-libmodplug --enable-libmp3lame --enable-libmysofa --enable-libopencore-amrnb --enable-libopencore-amrwb --enable-libopenh264 --enable-libopenjpeg --enable-libopus --enable-librubberband --enable-libshine --enable-libsnappy --enable-libsoxr --enable-libspeex --enable-libtheora --enable-libtwolame --enable-libvidstab --enable-libvmaf --enable-libvo-amrwbenc --enable-libvorbis --enable-libvpx --enable-libwebp --enable-libx264 --enable-libx265 --enable-libxavs --enable-libxvid --enable-libzimg --enable-libzmq --enable-libzvbi --enable-version3 --pkg-config-flags=--static --disable-ffplay
  libavutil      57.  8.100 / 57.  8.100
  libavcodec     59. 12.100 / 59. 12.100
  libavformat    59.  9.100 / 59.  9.100
  libavdevice    59.  0.101 / 59.  0.101
  libavfilter     8. 17.100 /  8. 17.100
  libswscale      6.  1.100 /  6.  1.100
  libswresample   4.  0.100 /  4.  0.100
  libpostproc    56.  0.100 / 56.  0.100
Hyper fast Audio and Video encoder
usage: ffmpeg [options] [[infile options] -i infile]... {[outfile options] outfile}...
Use -h to get full help or, even better, run 'man ffmpeg'
これでようやく、岡持ちMac ProのmacOS High Sierraでもffmpegが使えるようになったので、次のページでffmpegからiSightカメラでの静止画撮影に進みます。
投稿 岡持ちMac ProのApple Cinema Display内蔵カメラをffmpegで撮影 は Fun Scripting 2.0 に最初に表示されました。